Mandrels are a commonly used piece of tooling when bending pipe and tube. Used correctly, mandrels can help prevent some of the most common problems and issues you can run into when pipe bending.
However, if not positioned correctly, mandrels can also cause problems of their own. It is vital that you understand how to mandrel bend a pipe before you begin bending.
First, however, it is important to understand why we use a mandrel when bending pipe.
Why Do We Use a Mandrel?
The most basic reason to use a mandrel when bending a pipe is for support. The mandrel offers support throughout the bend radius and holds the pipe firmly against the bend die groove.
One of the most important problems prevented by using a mandrel is spring back. Springbok, or the tendency of a metal to return to its original shape, can be a serious problem when bending pipe. A mandrel is the easiest way to prevent spring back.
How to Mandrel Bend a Pipe
The first step in mandrel bending is the same as any bend, you must set your tooling. Correct tooling setting is essential to performing the bend correctly. Improperly set tooling can result in wrinkles, kinks, buckling, bulging, and tube collapse. In fact, the first step in troubleshooting any pipe bending problem should be checking the tooling setup.
Once your machine is ready and your tooling set, you can now begin. When using a mandrel, the tube is first pulled over the mandrel, which is held in a fixed position. That position, however, is very important.
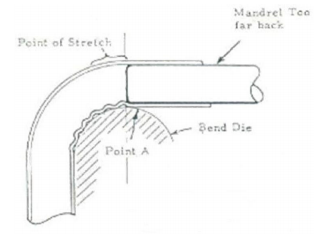
For example, when the mandrel is placed too far back in the pipe, it is not far enough forward to generate the necessary pressure on the inside of the bend to compress the material. Your bend may begin well enough, but once the bend has progressed past 20 degrees or so, the material begins to push back. This, in turn, forms a ripple or a wave.
The ripple is forming and being flattened continually between the mandrel and the bend die. When the pipe is removed from the bend die, you will observe a large buckle (point A in the diagram below).
For example, when the mandrel is placed too far back in the pipe, it is not far enough forward to generate the necessary pressure on the inside of the bend to compress the material.
Your bend may begin well enough, but once the bend has progressed past 20 degrees or so, the material begins to push back. This, in turn, forms a ripple or a wave.
The ripple is forming and being flattened continually between the mandrel and the bend die. When the pipe is removed from the bend die, you will observe a large buckle (point A in the diagram below).
Moving the mandrel too far forward can also result in serious problems with the bend. Mainly, when the mandrel is too far forward, it can cause a bump to form at the end of the bend.
These types of issues can become worse when making tight bends or when bending thin-walled tubing. It is essential that your mandrel, as well as your other tooling, is set correctly.
Learn More
Click here or follow the link below to download a free introduction to tube bending to learn more, or contact us at any time with any questions or comments you may have.
You may find these other mandrel pipe bending articles useful: